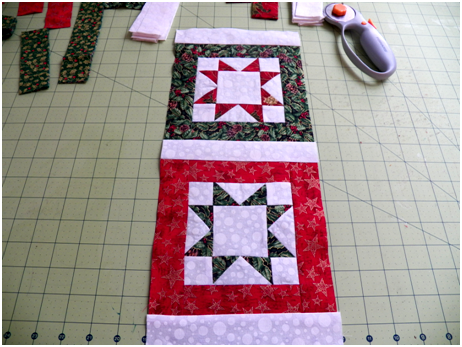
There's something about the North Star pattern that especially lends itself to Christmas designs. My mom and I have been having fun working on these large table runners (about 16 by 32 inches) that are pieced and then quilted with "stitch in the ditch" or a close outline to the seams. I've given the directions for one exactly like I made (assuming you find the same fabric!), but you could use any type of fabric and arrange the blocks in different ways.
Materials:
*fat quarters of four different Christmas fabrics - I chose two that were mostly green and two that were mostly red. All four have gold printing in them.
*1/2 yard white fabric - mine has different sizes of dots that I thought looked like snowflakes
*1/2 yard backing fabric
*3 yards bias tape
*fusible felt or low loft batting
*large safety pins
I'll refer to the red poinsettia fabric as R1, the red star fabric as R2, the green pinecone fabric as G1, and the green holly fabric as G2.
For the blocks, you'll need:
8 squares of white fabric, 2 5/8" by 2 5/8"
32 rectangles of white fabric, 1 1/2" by 2 5/8"
32 squares of white fabric, 1 1/2" by 1 1/2"
16 squares of each Christmas fabric, 1 1/2" by 1 1/2"
borders - 4 rectangles of each Christmas fabric, 4 7/8" by 1 1/2" (you can also just cut these to 5" and trim the excess off after sewing) and 4 rectangles of each Christmas fabric, 7" by 1 1/2"
For the connecting strips, you'll need:
22 rectangles of white fabric, 7" by 1 1/2"
5 squares of R1, 1 1/2" by 1 1/2"
4 squares of G1, 1 1/2" by 1 1/2"
4 squares of R2, 1 1/2" by 1 1/2"
2 squares of G2, 1 1/2" by 1 1/2"
1. Make North Star blocks. I have a tutorial here on how to do that if you're new to the pattern.
Block 1 - R1 flying geese, G1 border
Block 2 - G1 flying geese, R2 border
Block 3 - R2 flying geese, G2 border
Block 4 - G2 flying geese, R1 border
Block 5 - G1 flying geese, R1 border
Block 6 - R1 flying geese, G2 border
Block 7 - G2 flying geese, R2 border
Block 8 - R2 flying geese, G1 border
This is Block 1:
2. Make Panel A of blocks. Sew a 7 inch piece of white fabric to the top and bottom of Block 1.
Sew Block 2 to the bottom white fabric.
Sew a 7 inch piece of white fabric to the bottom of Block 2.
Continue on in this way using the guide below.
This is Panel A.
2. Make Strip 1. Sew a square of R2 to a 7 inch piece of white fabric. Sew a square of G1 onto the bottom of the white fabric. Sew another 7 inch piece of white fabric to the bottom of the G1 square. Continue on in this way using the guide above.
3. Lay Strip 1 next to Panel A. Each rectangle (with arrows) should be the same size as the rectangle across from it - adjust if you have any that got off.
4. Pin Strip 1 to Panel A and sew, matching seams.
5. Make Strip 2 following the guide above. Pin and sew it to the other long edge of Panel A, matching seams. Make Panel B (following the guide above). Pin and sew it to Strip 2, matching seams. Make Strip 3 and attach it to Panel B. Iron.
6. Cut a piece of backing material and fusible felt or batting about 1/2 inch larger on all sides than your quilt top. If you're using fusible felt, fuse to the back of the quilt top. Layer the quilt top, batting (if using this instead of the felt), and the backing and pin together.
7. Beginning in the middle and working outward, quilt by sewing in the seam line (stitch in the ditch) or slightly off of each seam line (outline quilting). I used white as the top thread and red in the bobbin, but you can use one color in both if you'd rather. Roll the mat up when the bulky part is between your needle and your machine.
8. Trim edges even. Bind the edges with seam binding (see here for a tutorial on how to make and use). Iron and you're finished!
Happy Creating! Deborah


Beautiful & very nice,, you are very well my sweet friend !!!
ReplyDeleteKeep sharing awesome creations.
Cheers :)
Deborah, I'm constantly wowed by your awesome tutorials and your pretty quilts. Keep sharing!
ReplyDeleteI made this over the weekend, and it turned out GREAT! Thank you for posting this beautiful table runner. My family and I will enjoy it this Christmas!!
ReplyDeleteAwsome.... Thanks for sharing :) so looking forwards to making this and more assorted Christmas decorations for this Christmas
ReplyDelete